CURL ÇEŞİTLERİ
 FOTOĞRAFLAR / POST / GRAFİK TASARIM: KRISTIN ESS
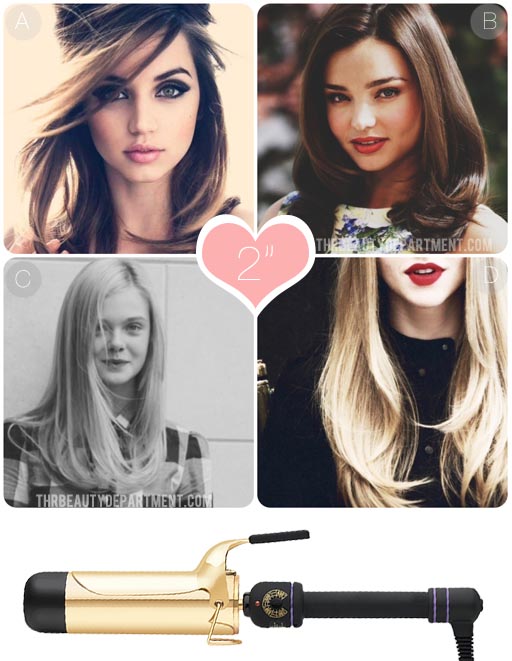
Ben düşünüyordum Dün, biz gerçekten kıvrılma her türlü göstermek için bir yol gerekir.Değil tabii iyi genlerden olsun bukleler, ancak kıvrık demir, değnek ya da bir demir kullanırken için çaba tür. Bu ben saç yeni öğreticiler göndermek zaman ben işaret etmek için özel bir yazı var ve ben bu saç modeli almak için kullanıyorum türü kıvırmak başvuracak şekilde ilerlemeye yardımcı olacağını düşünüyorum. Bu her teknik ürettiği düzelene ne tür demir boyutu hakkında, yaklaşık kıvırma yöntemi değil ve çünkü bu yazı, sadece 1 "varil kıvrık demir kullanıyoruz. Tamam, biz en bir "Curl Kataloğu" yapmak olur mu? Bu bizim bulmak dalga türüdür HERGÜN DALGALAR videosu. Siz üst veya orta başlar ve aşağı yönlü inç. Bu o kadar kolay ve çabuk çünkü kıvrılıp benim her zaman go-favori yoludur. Eğer orta veya üst başladığınızda yardımcı olacak saç bu bölümünün, doğrudan demir ısı uygulayarak çünkü sen de biraz ekstra tutmak o kadar beklemeye ile çok. Eğer herhangi bir bukle varsa, aynı zamanda sıcak kelepçe, tek tarafı açık olurdu bir değnek aksine, her iki tarafı mühür saç presler (ama biz aşağıda geleceğiz) çünkü özellikle bu seviyorum.
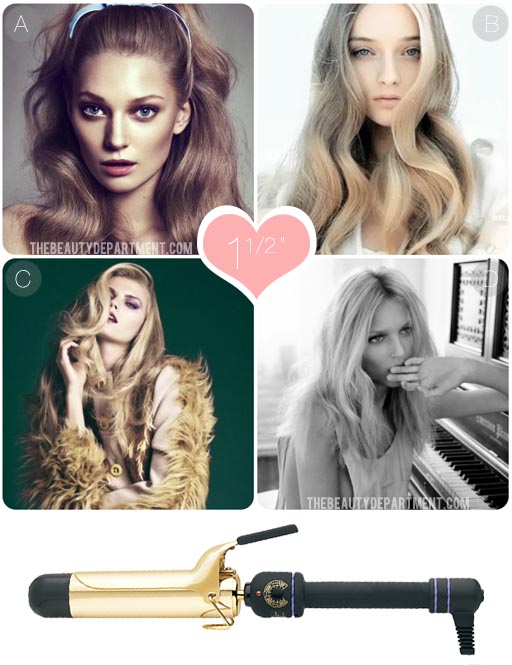
 Bu benim biridir az bob uzunluğunda veya daha uzun olan herkes için favori kıvırma yöntemleri, ve genellikle biz gençken biz ... bizim kız kardeş, teyze, nineler, anneler, en iyi arkadaşlar, vb tarafından ilk öğretilen konum biri. Bunu alt kısmında başlar ve yukarı doğru kıvırın mantıklı olacağını düşünüyorum, ama uçlarından ucunda koyar ısı en ve en çok ihtiyacımız nerede ortasında çok az kıvrık olur. Eğer "uçlarına orta" yöntem kadar iyi kullanırsanız uzun vadede, bu sadece uçları kurur ve kıvırmak çok daha hızlı o olacak daha düşecek. Bu kıvırmak ağır alt ve bob uzunlukta saç bakmak super "üçgen" den bir şey uzun yapmak eğiliminde olacaktır. Bu dolgun bir "silindir seti" bir görünüm istiyorsanız, kısa saçlı olsa-kadınlar için büyük kim olduğunu biliyorum.
 Yukarıdaki "Orta Ends" yöntemi bakmak gibi ama tutmaz bulmak, ya da o eski Hollywood'un glam havası istiyorsanız, bu bir deneyin! Saçınızın Curl, sonra bir ayar klip ile ayarlayın ve tüm ısı gitti ve saç dokunmak için soğuk kadar soğumasını bekleyin. Orta yeterince sıcak olana kadar ben yerine sadece uçlarını kızartma saç ortasında doğrudan demir ısı uygulayın böylece ben hala ortasında başlaması ve aşağı uçlarına yoluma inç istiyorum. Bunu ayarlamak ve izin serin ama ne zaman, size bunu istediğiniz şekilde tutan bunun çok daha yüksek bir şans var.
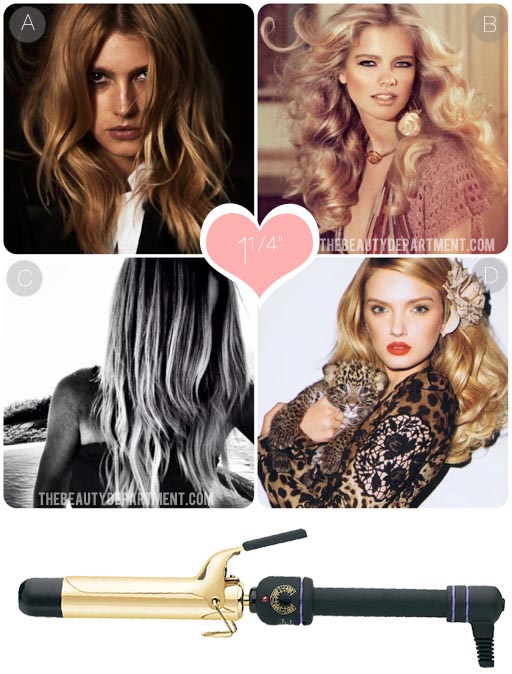
 Merhaba, cennet. Bir kıvrık demir + diken yapabilirsiniz çok daha fazla dips nereye koyduğunuzu kontrol edebilirsiniz çünkü bu kısa saçlar için en iyisidir. Eğer biz uzun saç yaptım gördüğünüz gibi düz demir dalgalar, saç herhangi bir uzunlukta yapılabilir bu öğretici . Bu öğrenmek için bir süre alır, ancak bunu asmak olsun, o kadar kolay ve hızlı.
 Bu, tüm doğal doku kızlar ya bir gün uzak kendi doğal kıvırcık saç geçirmek isteyen herkes için inanılmaz bir tekniktir. Onlar da, kıvrık demir dalgalar olmasını isterken ben güzel doğal kıvırmak bazı müşterimiz var, ama her seferinde büyük bir de! Kıvırmak için bir demir kullanarak size kıvırmak ise bukle bir şişlik veya şansını ortadan kaldırarak, her iki taraftan saç basarak demektir. Ancak daha fazla vesileyle, ben her gün yapıyor tavsiye şey değil. Her gün güçlü bir demir ile her iki taraftan saçınıza içine ısı basılması, benim görüşüme göre, kuruluğa neden olabilir. Ama sonra tekrar herhangi bir sıcak aracı yüzden sadece dikkatli olabilir! Eğer ek ısı ihtiyacınız yoksa, o zaman en iyi "Ends Curling Orta" de kıvrık demir yöntemi deneyin.
 Tamam, WAND! İnsanlar bir değnek seviyorum. Bir değnek ile ilgili en iyi şey, hacim birçok almak için gidiyoruz olmasıdır. Orada (bir kıskaç gibi) diğer tarafta basarak bir şey yok yani saç bile kıvrılmış olurken tam kalabilirler. Diğer bir deyişle, bu sıcak barrel karşı "çökerttiğini" varlık değil. Bu yöntem ile, saç hiçbir büküm ile namlu karşı düz sarılmış olduğunu görebilirsiniz. Dışarı fırçalanmış bir kez etki çok model-y kıvrılmış. Bu hacimli dalgaları istediği ince saçlar için benim favorim! Demir karşı düz saç tutmak için, aksi takdirde saç doğal varil etrafında bükülme isteyeceksiniz, ellerini sen demir dolaşmak her zaman ayarlamanız gerekir. İlk değnek ile kapalı Pratik!
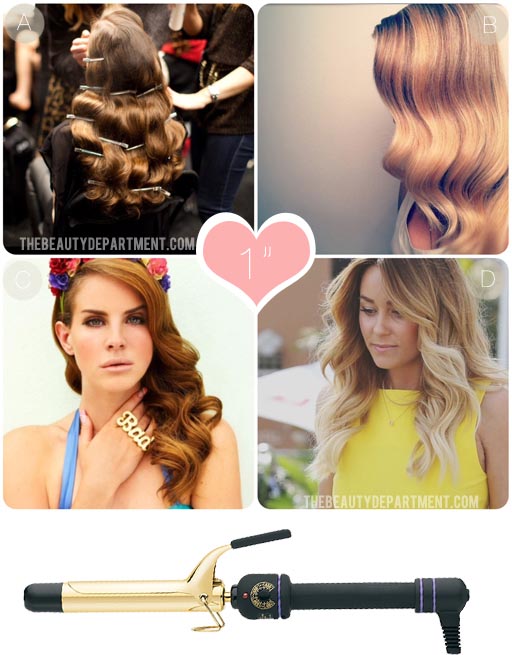
 Değnek yolu sayısı 2! Doğal kıvırmak rafine çalışan herkes için bu aşk. Bunu sarmadan önce saç çevirin. Süper sıkı ve doğal kıvırmak desen yönü büküm emin olun. , Değnek etrafına sarın bırakın, ve sonra yavaşça çekin ve parmaklarınızla şişmanlatıyor. Desen, çok doğal kıvrılma gibi, kesin değil çünkü ben bu seviyorum. Bu bir noktada ve başka bir biraz gevşek biraz sıkı bulunuyor. Bu bukle bir asi yama var dalgalı kızlar için harika.
 Bu yöntem, "Boho-y" tüm bakmak daha verecek. Sen dibinde kıvrık demir gibi deseni üst ve gevşek, tousled dalgaları alırsınız. Ben gerçekten kalın saç ile süper uzun saç veya bu herkes için seviyorum. Eğer ortada geldiğinizde sonra, saç gitmesine izin vermeyin, sadece sarma tutmak ve doğal bobin olacak, üstünde düz sarma ile başlayın.
 Son ama en az değil, denizkızı yapma 3-uçlu demir. Bu aynı zamanda bir sallama demir olarak adlandırılır. Kesinlikle yapar desen görebilirsiniz. Neredeyse büyük, yuvarlak kıvırma gibi. Ben kullanılan bu zaman, benim açıları kadar geçiş istiyorum. Yani örneğin-Ben mükemmel yatay basın ve daha sonra bir kısmı aşağı hareket ve biraz çapraz yapacağız. Bu model biraz daha doğal görünmesini sağlar ve kıvrımlı bir görünüm kırılır.Ben bir plaj düğün katılıyor ise bu kullanmak ve kanal isterdi
GOOGLEDAN ÇEVİRİ..
kötü bir çeviri.
artık mazur görün ama ingilizcesinide koyayım yinede.:)


TYPES OF CURL
PHOTOS/POST/GRAPHIC DESIGN: KRISTIN ESS
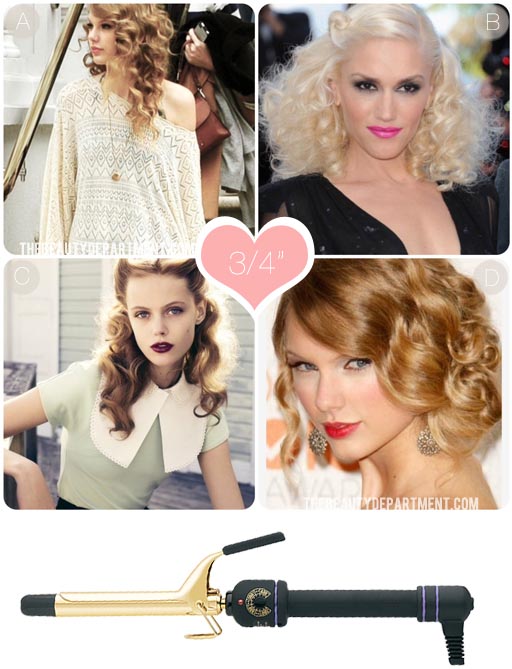
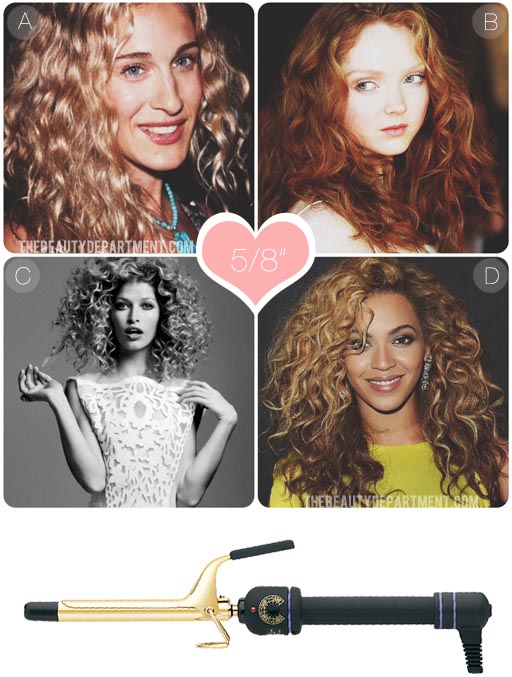
Yesterday I was thinking, we really need a way to show each kind of curl. Not the natural curls that you get from good genes, but the kind you strive for when using your curling iron, wand or even a flat iron. I think this will be helpful moving forward so that when I post hair new tutorials I have a specific post to point to and reference the type curl Im using to get that hairstyle. In this post, were only using a 1″ barrel curling iron because this isnt about iron size, its about curl method and what type of curl each technique produces. Okay, lets make a Curl Catalogue, shall we?This is the kind of wave you find in our EVERYDAY WAVES video. You start at the top or middle and inch your way down. This is my go-to all time favorite way to curl because its so easy and quick. You also get a little extra hold when you start from the middle or top because youre applying iron heat directly to that portion of the hair, which will helpso much with hold. I specifically love this because if you have any frizz, the clamp, which is also hot, presses the hair to seal both sides, unlike a wand where you would have one side open (but well get to that below).This is one of my least favorite curling methods for anyone with bob length or longer, and its usually the one were taught first by our sisters, aunts, grandmas, moms, best friends, etc
when were young. Youd think it would make sense to start at the bottom and curl upward, but curling from the ends up puts most of the heat on the ends and very little on the middle which is where we need it most. Long run, this just dries out your ends and curl will fall out much quicker than it will if you use the middle to ends method up top. This curl is bottom heavy and will tend to make anything longer than bob length hair look super triangular. Know who this IS great for though women with short hair who want a fuller roller set look.If you like the look of the Ends to Middle method above but find that it doesnt hold, or if you want that Old Hollywood glam vibe, try this one! Curl your hair, then set it with a setting clip and let it cool until all of the heat is gone and the hair is cold to the touch. I still like to start in the middle and inch my way down to the ends so that I can apply direct iron heat to the middle of the hair instead of just frying the ends until the middle gets hot enough. But when you set it and let it cool, you have a much higher chance of it holding the way you want it to.Hello, heaven. These are the best for shorter hair because you can control where you put the dips + bumps much more than you can with a curling iron. Flat iron waves can be done on any length of hair, as you can see we did it on long hair in this tutorial. It takes a while to learn, but once you get the hang of it, its so easy and fast.This is an amazing technique for all our natural texture girls or anyone who wants to spend a day away from their naturally curly hair. I have some clients who have beautiful natural curl, but every once in a great while they want to have curling iron waves, too! Using a flat iron to curl means youre pressing the hair from both sides, eliminating puffiness or chance of frizz while you curl. Its not something I recommend doing every day, but more on occasion. Pressing heat into your hair from both sides with a powerful flat iron every day could cause dryness, in my opinion. But then again so can any hot tool so just be mindful! If you dont need the additional heat, then try the curling iron method at the top Curling Middle to Ends.Okay, the WAND! People love a wand. The best thing about a wand is that youre going to get lots of volume. Theres nothing pressing on the other side (like a clamp) so the hair can stay full even while being curled. In other words, its not being smashed against the hot barrel. With this method, you can see that the hair is being wrapped flat against the barrel with no twisting. The effect is a very pattern-y curl once its brushed out. This is my favorite for fine hair who wants voluminous waves! To keep the hair flat against the iron, youll have to adjust your hands each time you go around the iron, otherwise the hair will naturally want to twist around the barrel. Practice with the wand off first!Wand way number 2! Love this for anyone trying to refine a natural curl. Twist the hair before you wrap it. Not super tight, and make sure you twist the direction of the natural curl pattern. Wrap it around the wand, release, and then gently pull and fatten it up with your fingers. I love this because the pattern, much like natural curl, isnt exact. Its a little tighter in one spot and a little looser in another. This is great for wavy girls who have an unruly patch of frizz.This method is going to give you a more boho-y look all over. Youll get a curling iron-like pattern up top and loose, tousled waves at the bottom. I love this for super long hair or anyone with really thick hair. Start by flat-wrapping at the top, then when you get to the middle, dont let go of the hair, just keep wrapping and it will naturally coil.Last but not least, the mermaid-making 3-prong iron. This is also called a waving iron. You can definitely see the pattern it makes. Its almost like a larger, rounder crimper. Whenever I used this, I like to switch up my angles. So for example I will press it perfectly horizontal and then move down a section and do it slightly diagonal. This makes the pattern look a little more natural and breaks up the crimped look. I would use this if I was attending a beach wedding and wanted to channel Daryl Hannah from Splash. Okay, now spill it! Which one is your favorite method and what type of hair do you have? Would love to hear about it in the comments below because your feedback could greatly help another reader who is trying to find their new favorite
 FOTOĞRAFLAR / POST / GRAFİK TASARIM: KRISTIN ESS
Ben düşünüyordum Dün, biz gerçekten kıvrılma her türlü göstermek için bir yol gerekir.Değil tabii iyi genlerden olsun bukleler, ancak kıvrık demir, değnek ya da bir demir kullanırken için çaba tür. Bu ben saç yeni öğreticiler göndermek zaman ben işaret etmek için özel bir yazı var ve ben bu saç modeli almak için kullanıyorum türü kıvırmak başvuracak şekilde ilerlemeye yardımcı olacağını düşünüyorum. Bu her teknik ürettiği düzelene ne tür demir boyutu hakkında, yaklaşık kıvırma yöntemi değil ve çünkü bu yazı, sadece 1 "varil kıvrık demir kullanıyoruz. Tamam, biz en bir "Curl Kataloğu" yapmak olur mu?
 Bu bizim bulmak dalga türüdür HERGÜN DALGALAR videosu. Siz üst veya orta başlar ve aşağı yönlü inç. Bu o kadar kolay ve çabuk çünkü kıvrılıp benim her zaman go-favori yoludur. Eğer orta veya üst başladığınızda yardımcı olacak saç bu bölümünün, doğrudan demir ısı uygulayarak çünkü sen de biraz ekstra tutmak o kadar beklemeye ile çok. Eğer herhangi bir bukle varsa, aynı zamanda sıcak kelepçe, tek tarafı açık olurdu bir değnek aksine, her iki tarafı mühür saç presler (ama biz aşağıda geleceğiz) çünkü özellikle bu seviyorum.
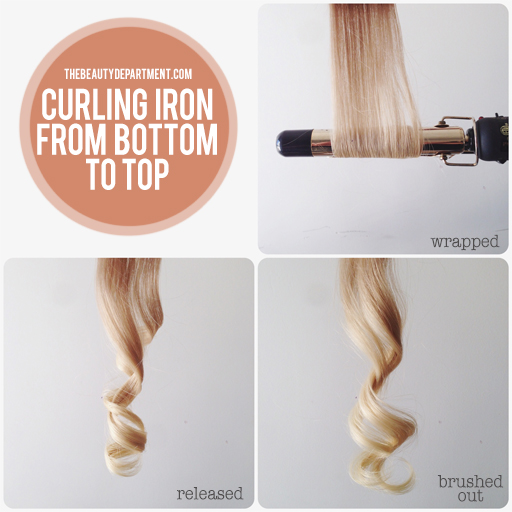 Bu benim biridir az bob uzunluğunda veya daha uzun olan herkes için favori kıvırma yöntemleri, ve genellikle biz gençken biz ... bizim kız kardeş, teyze, nineler, anneler, en iyi arkadaşlar, vb tarafından ilk öğretilen konum biri. Bunu alt kısmında başlar ve yukarı doğru kıvırın mantıklı olacağını düşünüyorum, ama uçlarından ucunda koyar ısı en ve en çok ihtiyacımız nerede ortasında çok az kıvrık olur. Eğer "uçlarına orta" yöntem kadar iyi kullanırsanız uzun vadede, bu sadece uçları kurur ve kıvırmak çok daha hızlı o olacak daha düşecek. Bu kıvırmak ağır alt ve bob uzunlukta saç bakmak super "üçgen" den bir şey uzun yapmak eğiliminde olacaktır. Bu dolgun bir "silindir seti" bir görünüm istiyorsanız, kısa saçlı olsa-kadınlar için büyük kim olduğunu biliyorum.
 Yukarıdaki "Orta Ends" yöntemi bakmak gibi ama tutmaz bulmak, ya da o eski Hollywood'un glam havası istiyorsanız, bu bir deneyin! Saçınızın Curl, sonra bir ayar klip ile ayarlayın ve tüm ısı gitti ve saç dokunmak için soğuk kadar soğumasını bekleyin. Orta yeterince sıcak olana kadar ben yerine sadece uçlarını kızartma saç ortasında doğrudan demir ısı uygulayın böylece ben hala ortasında başlaması ve aşağı uçlarına yoluma inç istiyorum. Bunu ayarlamak ve izin serin ama ne zaman, size bunu istediğiniz şekilde tutan bunun çok daha yüksek bir şans var.
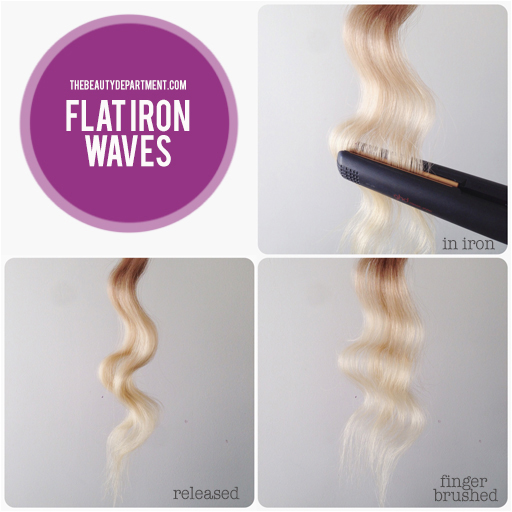 Merhaba, cennet. Bir kıvrık demir + diken yapabilirsiniz çok daha fazla dips nereye koyduğunuzu kontrol edebilirsiniz çünkü bu kısa saçlar için en iyisidir. Eğer biz uzun saç yaptım gördüğünüz gibi düz demir dalgalar, saç herhangi bir uzunlukta yapılabilir bu öğretici . Bu öğrenmek için bir süre alır, ancak bunu asmak olsun, o kadar kolay ve hızlı.
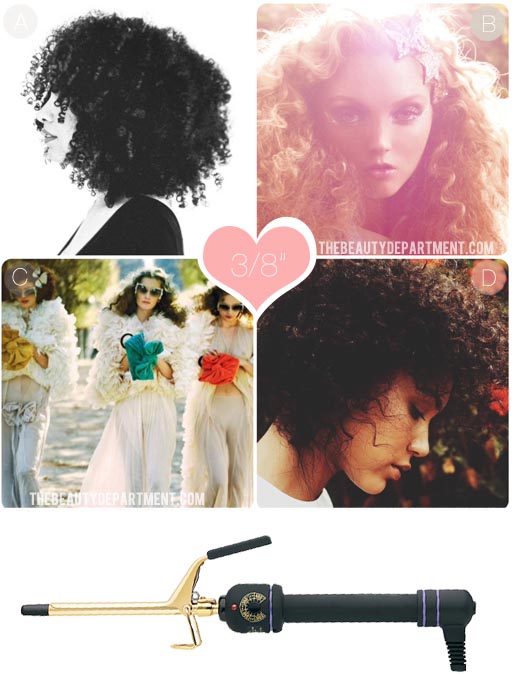
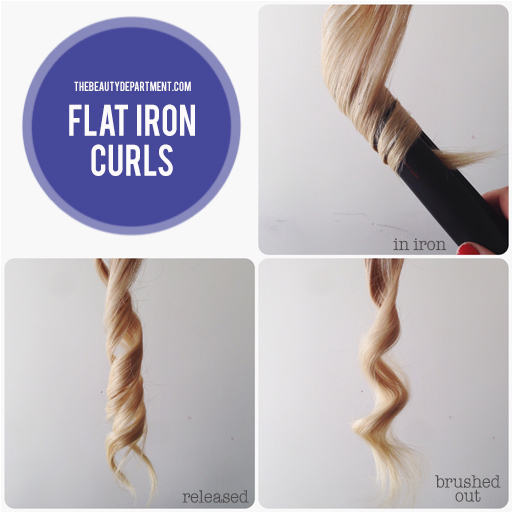 Bu, tüm doğal doku kızlar ya bir gün uzak kendi doğal kıvırcık saç geçirmek isteyen herkes için inanılmaz bir tekniktir. Onlar da, kıvrık demir dalgalar olmasını isterken ben güzel doğal kıvırmak bazı müşterimiz var, ama her seferinde büyük bir de! Kıvırmak için bir demir kullanarak size kıvırmak ise bukle bir şişlik veya şansını ortadan kaldırarak, her iki taraftan saç basarak demektir. Ancak daha fazla vesileyle, ben her gün yapıyor tavsiye şey değil. Her gün güçlü bir demir ile her iki taraftan saçınıza içine ısı basılması, benim görüşüme göre, kuruluğa neden olabilir. Ama sonra tekrar herhangi bir sıcak aracı yüzden sadece dikkatli olabilir! Eğer ek ısı ihtiyacınız yoksa, o zaman en iyi "Ends Curling Orta" de kıvrık demir yöntemi deneyin.
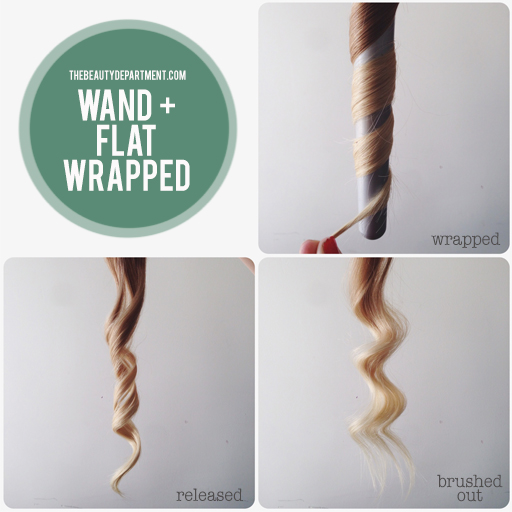 Tamam, WAND! İnsanlar bir değnek seviyorum. Bir değnek ile ilgili en iyi şey, hacim birçok almak için gidiyoruz olmasıdır. Orada (bir kıskaç gibi) diğer tarafta basarak bir şey yok yani saç bile kıvrılmış olurken tam kalabilirler. Diğer bir deyişle, bu sıcak barrel karşı "çökerttiğini" varlık değil. Bu yöntem ile, saç hiçbir büküm ile namlu karşı düz sarılmış olduğunu görebilirsiniz. Dışarı fırçalanmış bir kez etki çok model-y kıvrılmış. Bu hacimli dalgaları istediği ince saçlar için benim favorim! Demir karşı düz saç tutmak için, aksi takdirde saç doğal varil etrafında bükülme isteyeceksiniz, ellerini sen demir dolaşmak her zaman ayarlamanız gerekir. İlk değnek ile kapalı Pratik!
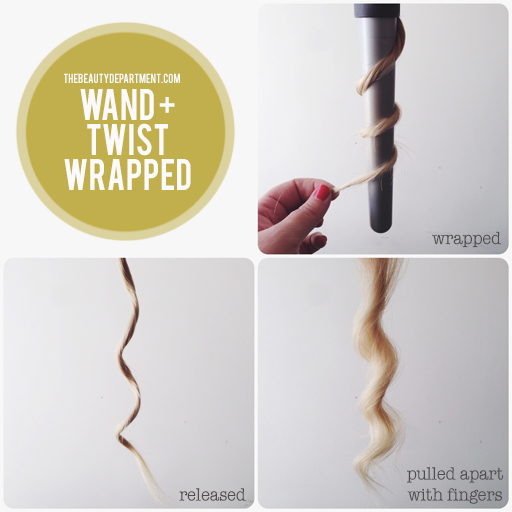 Değnek yolu sayısı 2! Doğal kıvırmak rafine çalışan herkes için bu aşk. Bunu sarmadan önce saç çevirin. Süper sıkı ve doğal kıvırmak desen yönü büküm emin olun. , Değnek etrafına sarın bırakın, ve sonra yavaşça çekin ve parmaklarınızla şişmanlatıyor. Desen, çok doğal kıvrılma gibi, kesin değil çünkü ben bu seviyorum. Bu bir noktada ve başka bir biraz gevşek biraz sıkı bulunuyor. Bu bukle bir asi yama var dalgalı kızlar için harika.
 Bu yöntem, "Boho-y" tüm bakmak daha verecek. Sen dibinde kıvrık demir gibi deseni üst ve gevşek, tousled dalgaları alırsınız. Ben gerçekten kalın saç ile süper uzun saç veya bu herkes için seviyorum. Eğer ortada geldiğinizde sonra, saç gitmesine izin vermeyin, sadece sarma tutmak ve doğal bobin olacak, üstünde düz sarma ile başlayın.
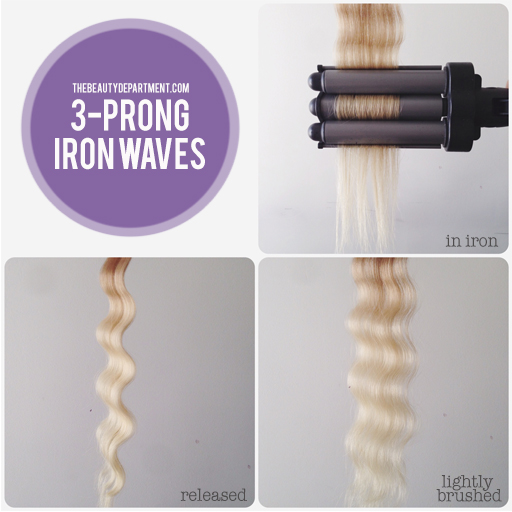 Son ama en az değil, denizkızı yapma 3-uçlu demir. Bu aynı zamanda bir sallama demir olarak adlandırılır. Kesinlikle yapar desen görebilirsiniz. Neredeyse büyük, yuvarlak kıvırma gibi. Ben kullanılan bu zaman, benim açıları kadar geçiş istiyorum. Yani örneğin-Ben mükemmel yatay basın ve daha sonra bir kısmı aşağı hareket ve biraz çapraz yapacağız. Bu model biraz daha doğal görünmesini sağlar ve kıvrımlı bir görünüm kırılır.Ben bir plaj düğün katılıyor ise bu kullanmak ve kanal isterdi
 GOOGLEDAN ÇEVİRİ..
kötü bir çeviri.
artık mazur görün ama ingilizcesinide koyayım yinede.:)
TYPES OF CURL
PHOTOS/POST/GRAPHIC DESIGN: KRISTIN ESSYesterday I was thinking, we really need a way to show each kind of curl. Not the natural curls that you get from good genes, but the kind you strive for when using your curling iron, wand or even a flat iron. I think this will be helpful moving forward so that when I post hair new tutorials I have a specific post to point to and reference the type curl Im using to get that hairstyle. In this post, were only using a 1″ barrel curling iron because this isnt about iron size, its about curl method and what type of curl each technique produces. Okay, lets make a Curl Catalogue, shall we?
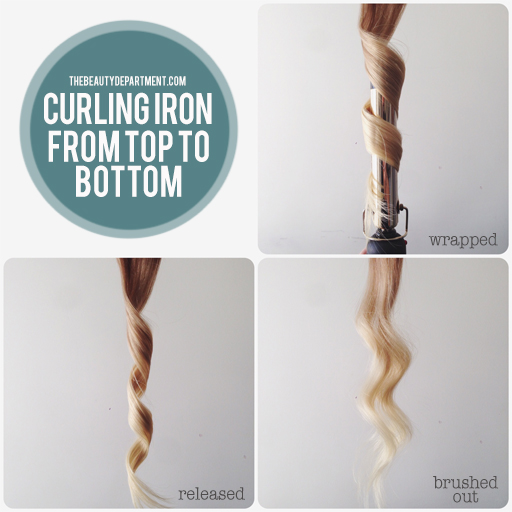
This is the kind of wave you find in our EVERYDAY WAVES video. You start at the top or middle and inch your way down. This is my go-to all time favorite way to curl because its so easy and quick. You also get a little extra hold when you start from the middle or top because youre applying iron heat directly to that portion of the hair, which will helpso much with hold. I specifically love this because if you have any frizz, the clamp, which is also hot, presses the hair to seal both sides, unlike a wand where you would have one side open (but well get to that below).This is one of my least favorite curling methods for anyone with bob length or longer, and its usually the one were taught first by our sisters, aunts, grandmas, moms, best friends, etc
when were young. Youd think it would make sense to start at the bottom and curl upward, but curling from the ends up puts most of the heat on the ends and very little on the middle which is where we need it most. Long run, this just dries out your ends and curl will fall out much quicker than it will if you use the middle to ends method up top. This curl is bottom heavy and will tend to make anything longer than bob length hair look super triangular. Know who this IS great for though women with short hair who want a fuller roller set look.If you like the look of the Ends to Middle method above but find that it doesnt hold, or if you want that Old Hollywood glam vibe, try this one! Curl your hair, then set it with a setting clip and let it cool until all of the heat is gone and the hair is cold to the touch. I still like to start in the middle and inch my way down to the ends so that I can apply direct iron heat to the middle of the hair instead of just frying the ends until the middle gets hot enough. But when you set it and let it cool, you have a much higher chance of it holding the way you want it to.Hello, heaven. These are the best for shorter hair because you can control where you put the dips + bumps much more than you can with a curling iron. Flat iron waves can be done on any length of hair, as you can see we did it on long hair in this tutorial. It takes a while to learn, but once you get the hang of it, its so easy and fast.This is an amazing technique for all our natural texture girls or anyone who wants to spend a day away from their naturally curly hair. I have some clients who have beautiful natural curl, but every once in a great while they want to have curling iron waves, too! Using a flat iron to curl means youre pressing the hair from both sides, eliminating puffiness or chance of frizz while you curl. Its not something I recommend doing every day, but more on occasion. Pressing heat into your hair from both sides with a powerful flat iron every day could cause dryness, in my opinion. But then again so can any hot tool so just be mindful! If you dont need the additional heat, then try the curling iron method at the top Curling Middle to Ends.Okay, the WAND! People love a wand. The best thing about a wand is that youre going to get lots of volume. Theres nothing pressing on the other side (like a clamp) so the hair can stay full even while being curled. In other words, its not being smashed against the hot barrel. With this method, you can see that the hair is being wrapped flat against the barrel with no twisting. The effect is a very pattern-y curl once its brushed out. This is my favorite for fine hair who wants voluminous waves! To keep the hair flat against the iron, youll have to adjust your hands each time you go around the iron, otherwise the hair will naturally want to twist around the barrel. Practice with the wand off first!Wand way number 2! Love this for anyone trying to refine a natural curl. Twist the hair before you wrap it. Not super tight, and make sure you twist the direction of the natural curl pattern. Wrap it around the wand, release, and then gently pull and fatten it up with your fingers. I love this because the pattern, much like natural curl, isnt exact. Its a little tighter in one spot and a little looser in another. This is great for wavy girls who have an unruly patch of frizz.This method is going to give you a more boho-y look all over. Youll get a curling iron-like pattern up top and loose, tousled waves at the bottom. I love this for super long hair or anyone with really thick hair. Start by flat-wrapping at the top, then when you get to the middle, dont let go of the hair, just keep wrapping and it will naturally coil.Last but not least, the mermaid-making 3-prong iron. This is also called a waving iron. You can definitely see the pattern it makes. Its almost like a larger, rounder crimper. Whenever I used this, I like to switch up my angles. So for example I will press it perfectly horizontal and then move down a section and do it slightly diagonal. This makes the pattern look a little more natural and breaks up the crimped look. I would use this if I was attending a beach wedding and wanted to channel Daryl Hannah from Splash. Okay, now spill it! Which one is your favorite method and what type of hair do you have? Would love to hear about it in the comments below because your feedback could greatly help another reader who is trying to find their new favorite